


Written by: Oğuzhan Arif
Introduction
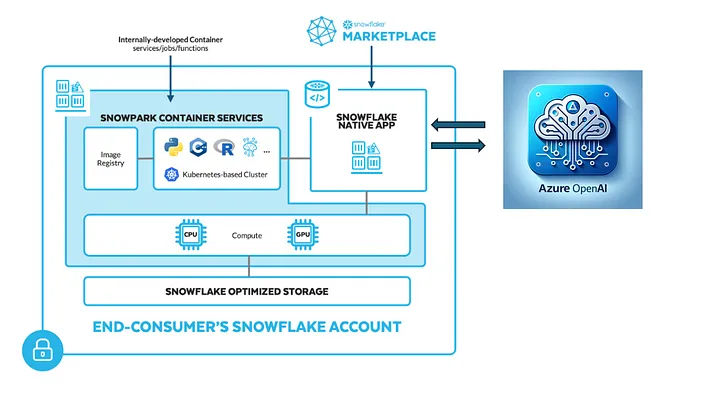
In the evolving landscape of data analytics, combining batch processing with Large Language Models (LLMs) on Snowflake presents groundbreaking advantages. Snowflake's cloud-based data warehousing capabilities, coupled with LLMs' analytical power, offer scalable and efficient solutions for handling extensive datasets. From automating insights extraction from customer feedback to conducting complex financial analyses, the potential applications are diverse. This article serves as a foundational step by step guide for leveraging LLMs on Snowflake databases, streamlining data analysis processes, and enabling strategic decision-making. Gain insights into processing data, creating value with prompt engineering, and conducting sentiment analysis, all within a secure and fast environment using Azure Open AI's unshared model.
Preparing the Environment
Before initiating the building process, ensure the following prerequisites are in place: a Snowflake account with an account admin role, an Azure environment with Azure OpenAI service, Docker Desktop installed on your local machine, and SnowCLI configured with a connection to your Snowflake account.
1. Prepare a role on Snowflake
   USE ROLE ACCOUNTADMIN;
   CREATE ROLE LLM_BACTH_ROLE;
   GRANT CREATE DATABASE ON ACCOUNT TO ROLE LLM_BACTH_ROLE;
   GRANT CREATE WAREHOUSE ON ACCOUNT TO ROLE LLM_BACTH_ROLE;
   GRANT CREATE COMPUTE POOL ON ACCOUNT TO ROLE LLM_BACTH_ROLE;
   GRANT CREATE INTEGRATION ON ACCOUNT TO ROLE LLM_BACTH_ROLE;
   GRANT MONITOR USAGE ON ACCOUNT TO ROLE LLM_BACTH_ROLE;
   GRANT BIND SERVICE ENDPOINT ON ACCOUNT TO ROLE LLM_BACTH_ROLE;
   GRANT IMPORTED PRIVILEGES ON DATABASE snowflake TO ROLE LLM_BACTH_ROLE;
   GRANT ROLE LLM_BACTH_ROLE TO ROLE ACCOUNTADMIN;
2. Prepare the environment on Snowflake by creating database, warehouse and stages.
   USE ROLE LLM_BACTH_ROLE;
   CREATE OR REPLACE DATABASE LLM_BATCH_DB;

   CREATE OR REPLACE WAREHOUSE LLM_BATCH_WH
     WAREHOUSE_SIZE = XSMALL
     AUTO_SUSPEND = 120 //specified as seconds
     AUTO_RESUME = TRUE;

   CREATE STAGE IF NOT EXISTS specs
   ENCRYPTION = (TYPE='SNOWFLAKE_SSE');
3. Create integrations for the service.
  USE ROLE ACCOUNTADMIN;
   CREATE SECURITY INTEGRATION IF NOT EXISTS snowservices_ingress_oauth
     TYPE=oauth
     OAUTH_CLIENT=snowservices_ingress
     ENABLED=true;

   CREATE OR REPLACE NETWORK RULE ALLOW_ALL_RULE
     TYPE = 'HOST_PORT'
     MODE = 'EGRESS'
     VALUE_LIST=('0.0.0.0:443', '0.0.0.0:80')

   CREATE EXTERNAL ACCESS INTEGRATION ALLOW_ALL_EAI
     ALLOWED_NETWORK_RULES = (ALLOW_ALL_RULE)
     ENABLED = true;
   GRANT USAGE ON INTEGRATION ALLOW_ALL_EAI TO ROLE LLM_BACTH_ROLE;
4. Create a compute pool for the services to run and image repository to push images.
USE ROLE LLM_BACTH_ROLE;
CREATE COMPUTE POOL IF NOT EXISTS LLM_BATCH_POOL
MIN_NODES = 1
MAX_NODES = 1
INSTANCE_FAMILY = standard_1;
CREATE IMAGE REPOSITORY LLM_BATCH_DB.PUBLIC.IMAGE_REPO;
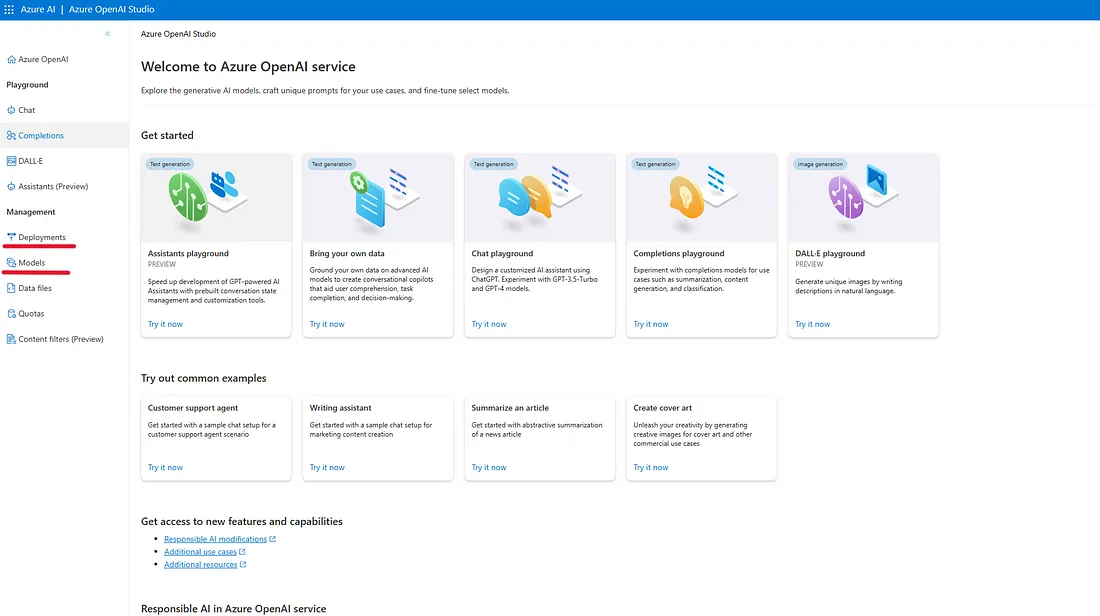
SHOW IMAGE REPOSITORIES IN SCHEMA LLM_BATCH_DB.PUBLIC;5. To prepare the LLM in the Azure environment, utilize the Azure OpenAI service to deploy a model accessible from the application deployed on Snowflake.
6. Access your Azure OpenAI service and launch Azure OpenAI Studio.

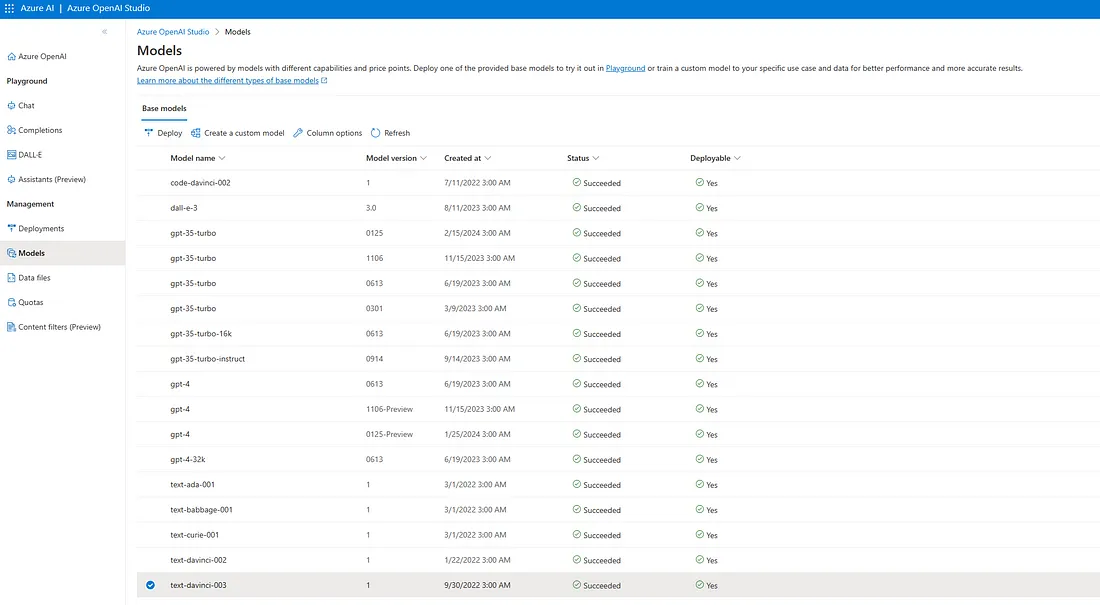
7. Navigate to the "Deployments" section on the left sidebar to view the list of models already deployed and ready for use. Then, proceed to the "Models" section.
8. Here, you can select from default models or create a custom model to refine a base model. This example will use the "text-davinci-003" model and "llm-batch-process" as the deployment name. Remember to adjust the model's capacity according to your data and business requirements to avoid API denials.
Building a Service with Snowflake and LLM Integration
Now that Snowflake and the LLM are ready the next step is to build a service on Snowflake and integrate prompt engineering with Snowflake's native application deployment. This involves preparing a Flask application deployed on an image, testing it on Docker Desktop, and then pushing it to Snowflake.
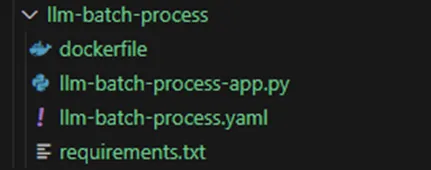
1. Begin by creating a new folder in your local directory and adding the Dockerfile provided below.
   FROM python:3.11

   # Copy the packages file into the build
   WORKDIR /app
   COPY ./ /app

   # run the install using the packages manifest file
   RUN pip install --no-cache-dir -r requirements.txt

   # Open port 9090
   EXPOSE 9090

   # When the container launches run the flask app
   ENV FLASK_APP="llm-batch-process-app.py"
   CMD ["flask", "run", "--host=0.0.0.0", "--port=9090"]
2. Add requirements.txt to the same folder as below.
   flask==2.0.1
   Werkzeug==2.2.2
   openai==0.28
3. Note: Services in Snowpark container services are defined by YAML files. Therefore, add "llm-batch-process.yaml" (ensure to change the repository hostname).
   spec:
     containers:
       - name:llm-batch-process
       image:<repository_hostname>/llm_batch_db/public/image_repo/llm-batch-process:dev
   endpoints:
       - name:llm-batch-process
       port:9090
       public:true
4. Finally, add "llm-batch-process-app.py" as shown below (replace with your own credentials). This is where the Flask app and a function will be created to return output from the LLM based on the input data and prompt we prepared. For a basic sentiment analysis, the provided prompt and configurations will be adequate. However, you can customize the configurations and model to suit your specific business case. Multiple inputs can be used to combine different information and extract insights accordingly.
   from flask import Flask, request, jsonify

   app = Flask(__name__)

   def generate_rate(comment)
     importopenai
     openai.api_type = "azure"
     openai.api_base = "<azure_openai_endpoint>"
     openai.api_version = "<api_version>"
     openai.api_key = "<api_key>"

     response = openai.Completion.create(
     engine= "llm-batch-process", ## this is your model deployment name
     prompt= f"""I will be providing you product reviews and I want you to rate the emotions of the review for the specific product within a range of 0 to 10. 0 will mean it is a negative comment, 5 when it is neutral and 10 when it is a positive comment.
     Only answer with the rate of the comment. Do not write or explain anything else.
     Comment:{comment}
     Your Rate:
     """,
     temperature= .1,
     max_tokens= 500,
     top_p= 1,
     frequency_penalty= 0,
     presence_penalty= 0,
     stop= None)

     return response["choices"][0]["text"]

     @app.route('/generate', methods=['POST'])
     def generate():

   # Get JSON data from request
   data = request.get_json()

   # Check if the 'data' key exists in the received JSON
   if 'data' not in data:
     return jsonify({ 'error': 'Missing data key in request'}), 400

   # Extract the 'data' list from the received JSON
   data_list = data['data']

   # Initialize a list to store converted values
   generated_data = []

   # Iterate over each item in 'data_list'
   for item in data_list:
     # You can do data validations or other things like below will check length of the input data
      if not isinstance (item, list) or len (item) <2:
       returnjsonify({ 'error': 'Invalid data format'}), 400

     comment = item[1]

     generated_data.append([item[0], generate_rate(comment)])

   # Return the converted data as JSON
   return jsonify({ 'data' : generated_data})

  if__name__=='__main__':
   app.run(debug=True)
Testing the Application with Docker Desktop
At this point, there are four files in the folder. Now, it's time to build and test the application on Docker Desktop.
1. In the terminal, navigate to the "llm-batch-process" folder and build the image, assigning it a name for the local repository.
docker build --platform=linux/amd64 -t <your_local_repository>/llm-batch-process:latest2. Once the build is completed, the images will be checked using "docker image list". Then, the image will be run on port 9090.
docker run -d -p 9090:9090 <your_local_repository>/llm-batch-process:latest3. While Docker is running, test the application's functionality by sending a web request from PowerShell with dummy data.
   ### Power shell
   Invoke-WebRequest -Uri http://localhost:9090/generate -Method POST -ContentType
   "application/json" -Body '{"data": [[0, "It is a very useful card holder"],[1,"It is broken after being used 2 times."]]}'
   ### Or use below from bash    curl.exe -X POST -H "Content-Type: application/json" -d '{"data": [[0, "It is a very useful card holder"],[1,"It is broken after being used 2 times."]]}' http://localhost:9090/generate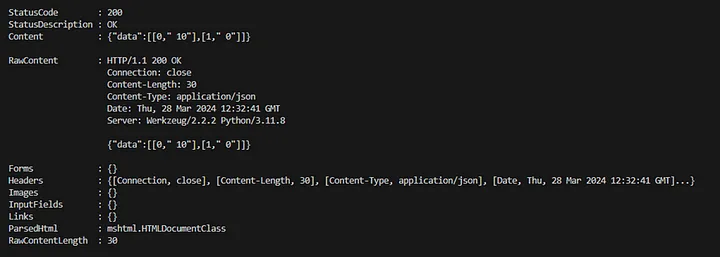
4. Upon receiving a status code of 200, the data is included in the content with ratings of comments that were sent. The first comment is rated as 10 and the second as 0. At this stage, an application is operational, returning LLM output based on the provided data and prepared prompt.
Deploying to Snowflake and Creating UDF:
1. The next step involves deploying this application to Snowpark container services, enabling the creation of a service on it. Subsequently, the service will be utilized to create a UDF that is callable within SQL queries or Snowpark notebooks.
2. To push the image to Snowflake, log in to your Snowflake account with Docker login and tag Docker with the Snowflake repository URL. It's important to note that the registry hostname is structured as "org-account.registry.snowflakecomputing.com".
   docker login <snowflake_registry_hostname> -u <user_name>
   docker tag <local_repository> /llm-batch-process:latest <snowflake_repository_url>/llm-batch-process:dev
   docker push <snowflake_repository_url> /llm-batch-process:dev
   ### < snowflake_repository_url> will be like "org-account.registry.snowflakecomputing.com/llm_batch_db/public/image_repo"
3. While this process may take some time, proceed to push the YAML file you have prepared. Using SnowCLI, place the YAML file into the specs stage, allowing it to fulfill its purpose
   cd ./llm-batch-process
   snow object stage copy ./llm-batch-process.yaml @specs --overwrite --connection
   <snow_connection_name>
4. After the file is loaded, you may create the service on Snowflake.
   use role LLM_BACTH_ROLE;
   create service LLM_BATCH_DB.PUBLIC.llm_batch_process
     in compute pool LLM_BATCH_POOL
     from @specs
     specification_file= 'llm-batch-process.yaml'
      external_access_integrations = (ALLOW_ALL_EAI); //The integration we created before ///// USE below to check service status
    CALL SYSTEM $GET_SERVICE_STATUS('LLM_BATCH_DB.PUBLIC.LLM_BATCH_PROCESS')
5. Once the service is created and running, create a UDF to use the service.
   CREATE OR REPLACE FUNCTION llm_udf (input string)
   RETURNS string
   from @specs
   SERVICE=LLM_BATCH_PROCESS //The service I just created
   ENDPOINT='llm-batch-process' //The endpoint within the yaml file
   MAX_BATCH_ROWS= 5 //limit the size ofthe batch
   AS '/generate' ; //The API endpoint
6. Now, with the UDF in place, you have the capability to leverage the power of the LLMs within SQL queries or Snowpark notebooks. To illustrate this concept, a table with dummy data on "LLM_TEST_TABLE_SENTIMENT" has been prepared.
7. Run the below query to get scores. At this stage, a database-level function enables the utilization of an LLM

   SELECT PRODUCT,COMMENT,LLM_UDF(COMMENT):: INT FROM
   LLM_BATCH_DB.PUBLIC.LLM_TEST_TABLE_SENTIMENT;
Closing
The scalability of Snowflake Native Applications and Azure OpenAI services renders this process more applicable in real-world databases. By adhering to the outlined steps, businesses can streamline their data processing workflows and unlock deeper insights.